Description
Why ML Launchpad?
ML Launchpad is an extensible Python package which makes it easy to publish machine learning models as RESTful APIs or microservices.
It separates the machine learning code (training, testing and predicting) from the environment-specific aspects (local or cloud deployment, API, database connections, format validation, model storage, etc.)
As Data Scientist, you can focus on the machine learning part of the problem, and don’t have to deal with deployment specifics. As a DevOps Engineer, you set up deployment once, and the uniformity of ML Launchpad applications makes it easy to re-use that setup for a broad variety of machine learning solutions.
While most approaches for streamlining machine learning solutions force you to select a particular set of machine learning libraries and/or a particular platform, ML Launchpad is agnostic to those, retaining the flexibility to choose any algorithm and any platform.
Structure
On the environment side, ML Launchpad sports a configurable REST API (using Flask), that can be run on any WSGI-compatible server.
Retrieving and persisting data is done through an extensible abstraction mechanism, called Data Sources and Data Sinks. Common types of Data Sources and Sinks like relational databases and CSV files are already included.
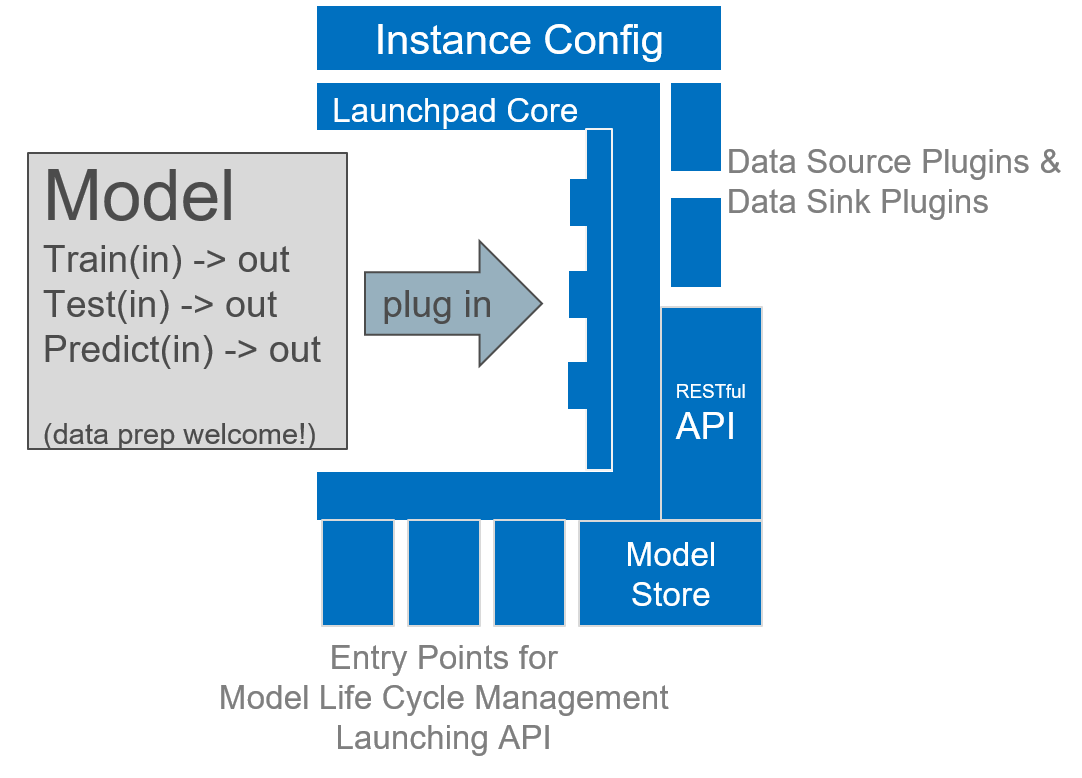
The model “payload” itself is the only time where code needs to be produced by the model developer. Here, the developer is basically filling in three functions in an R or Python template (Spark is supported, too):
train- uses data provided by Data Sources and returns a trained model objecttest- uses the provided model object and Data Sources and returns metrics about the modelpredict- uses the provided model object and (validated) API parameters to carry out a prediction and returns the prediction result
This is all the programming that is needed.
While enforcing the division into three functions might seem restrictive at first glance, in reality it makes simple things straightforward, while complex things are still achievable without complication due to the flexibility and configurability of ML Launchpad.
ML Launchpad handles how these functions are called, and what to do with the results. That way, the model can, unchanged, run on e.g. a Windows developer laptop using flat files, or a Linux cloud instance using databases.
How the model and the environment work together is defined using a configuration file. The RESTful API is defined using a RAML file (RESTful API Modeling Language).
Life of a Model
First, the model developer pip-installs the mllaunchpad
package so they can use it in their project.
Then, they use the TEMPLATE_* files
available in the examples directory to create three
files in their project: a model file
like <my_model_name>.py, a configuration file like
<my_model>_cfg.yml and a REST API definition file like
<my_model>.raml.
Note: For a step-by-step guide on this part, see the Tutorial section.
(To help with getting the RAML file started, the command
mllaunchpad gen my_source is used.)
When everything is filled in, it is time to train the model:
$ mllaunchpad -c <my_model>_cfg.yml t
The trained model is persisted in the model_store location
defined in the configuration file.
Note: Feel free to use the command line or the ML Launchpad’s
Python convenience API functions. Instead of using the -c
parameter, the location of the configuration
file can also provided by setting the LAUNCHPAD_CFG environment
variable (or implicitly by providing a file named LAUNCHPAD_CFG.yml
in the current working directory).
To test, the developer runs a (debugging-only!) REST API for
the model, using the command
api, or a for short:
$ mllaunchpad -c <my_model>_cfg.yml a
They test the API, and if it works as expected, the model can be used in a proper WSGI server, like for example gunicorn behind nginx.
There comes a time when the deployed model starts to get out of date.
To re-test the previously trained model, use the command retest/r
or the Python API convenience functions:
$ mllaunchpad -c <my_model>_cfg.yml r
The location of the configuration file (as well as that of a logging file)
can also be provided by setting the environment variables LAUNCHPAD_CFG
and LAUNCHPAD_LOG, respectively. If neither a parameter nor an
environment variable is available, mllaunchpad will look for a file
named LAUNCHPAD_CFG.yml in the current working directory.
Besides through the command line, the main functionality is also made
available through a Python convenience API.
See mllaunchpad.train_model(),
mllaunchpad.retest() and mllaunchpad.predict().
To log additional data to the model_store when training,
use mllaunchpad.report() in your train and test code.
To get all information on models available in the the model
store, use mllaunchpad.list_models().
Extensibility
ML Launchpad is designed with extensibility in mind.
The ML Launchpad package does not come with the whole kitchen sink, but still contains enough functionality to be able to deploy a complete machine learning API.
If the functionality which is provided is not sufficient, it can be extended in two major ways:
Without needing to modify the base package:
Adding new Data Source and Data Sink Extensions
Adding new Model Type Extensions
Using the Python Convenience API for implementing custom model life cycle management logic
Through contributions to the base package:
Adding support for OpenAPI specs in addition to RAML
Anything else :)
New types of Data Sources and Data Sinks can be added simply
by extending the base classes in a Python module of your own and
listing it in the plugins: section of your configuration.
New types of models (programming languages etc.) can be supported by creating a python model which acts as a bridge to the desired technology. In that sense, models already act like extensions.
Support for pip install-able extensions is on the roadmap,
too. If you want to help, that’s awesome! Let your voice be
heard at the corresponding GitHub issue.
Deployment Requirements
From a Python perspective, ML Launchpad only depends on a handful of
Python packages, which are automatically installed with
pip install mllaunchpad. We recommend using a Python virtual
environment such as venv.
For running an actual machine learning model in ML Launchpad, you need, as a minimum:
Training data and test data for your model (in a format and location that is accessible for the built-in DataSources). Side note: Validation data here counts as a part of training data because validation happens during the model creation (=training) phase.
A python module (
.pyfile) containing the implementation of thecreate_trained_model,test_trained_modelandpredictmethods of the model interfaces.A file system location that will become the
model_store.An API definition in form of a
.ramlfile, e.g. generated using thegenerate-ramlparameter of themllaunchpadcommand line tool, and adapted.A model configuration file that ties the above together.
Any computer to run the training and/or the API on.
The above are sufficient for trying out the model locally or on a test server (be it a virtual or physical machine).
ML Launchpad does not prescribe a lot of choices outside of its own realm. This makes it possible to run it in a large variety of different systems and environments (essentially anywhere where you can run Python).
This compatibility means that it is not production-ready out of the box. It is meant to be used in conjunction with other tools that are specialised on providing the missing features.
Here’s a by no means ideal, but relatively simple example scenario for an ML Launchpad production deployment of one model in a low to medium load setting (available as a template here):
Deployment on a single Linux VM instance (for now), with its own user to run as, in a subfolder of the user home, e.g. called
example. A Python virtual environment within which to dopip install mllaunchpadis not strictly necessary, but useful if several models are going to be deployed.Model config file and RAML file live in the same folder.
Your Python module with the model code lives here as well.
model_storein the config file points to a subfolder.We also adapt the existing
logging_cfg.ymlfile to fit our purposes. The file system structure so far looks like this:/home/ - my_user/ - example/ - .venv - my_model.py - my_config.yml - logging_cfg.yml - my.raml - model_store/The data sources in the config file point to where the data can be reached from this machine/user (e.g. csv files on a network mount, some DBMS server, etc.). Same for
my_model.py.To simplify our commands later, we put the locations of the config and log-config files in ML Launchpad environment variables by extending the
.bashrcfile:export LAUNCHPAD_CFG=/home/my_user/example/my_config.yml export LAUNCHPAD_LOG=/home/my_user/example/logging_cfg.yml # auto-enable our python virtual environment: cd /home/my_user/example source .venv/bin/activate
Training is scheduled e.g. weekly, using a tool like
cronor Control-M, which calls:mllaunchpad train
For now, we’ll not configure any re-testing of our deployed example model.
The API in this example is run using
gunicorn(pip install gunicorn), where the launch command is something like:$ gunicorn --workers 4 --bind 127.0.0.1:5000 mllaunchpad.wsgi
Because ML Launchpad’s builtin API does not provide any encryption, user management or load balancing, we outsource this to tools which are better at this, like
nginx(which needs its own configuration file, of which you can find an example in the examples download):$ nginx -c /home/my_user/example/nginx.conf -p /home/my_user/example/nginx
We don’t want to have to log in to interactively start
gunicorn, thennginx, so it is recommended to make these two a systemd service (specifying their interdependence using theAfterkeyword).If you’re in a corporate network which uses an Enterprise Service Bus like
Mule, you can use the existing RAML file as a basis for creating the service.
This kind of deployment can be adapted to multiple models, for example by:
adding more subfolders besides
example,making
systemduse the virtual environment (prepending/home/my_user/example/.venv/binto thePATH) instead of activating it in.bashrc,creating one
systemdgunicornservice per model using different port numbers, andadapting the
nginx.confto serve all of these port numbers.
Of course, with Web API deployment being the complex subject it is,
we only scraped the surface and there are a lot more
alternatives available, such as replacing gunicorn by another
WSGI-compatible server like Apache with mod_wsgi, using containers,
automatising scaling, etc.
